Wednesday, May 30, 2012

Mushroom and Bean Tortilla Casserole

I'm blogging with a belly full of beans and mushrooms. Dinner for today was this super easy casserole, thrown together from flour tortillas, kidney beans, mushrooms, salsa, and cheese. The photo might not look like much, but it's one of the most hearty, filling meals I've prepared for myself in quite a while.


Ingredients:
2 tsp extra-virgin olive oil
1/2 yellow onion, chopped
3/4 pounds cremini mushrooms, trimmed and quartered
1 garlic clove, minced
1/4 tsp cayenne pepper
1 can (15.5 ounces) kidney beans, drained and rinsed
4 medium flour tortillas. Leave one whole, halve 2, and quarter the last.
1 1/4 cups (4 ounces) shredded Monterey Jack cheese
1 1/2 cups salsa

It's fast and easy!
1. Preheat oven to 400 degrees.
2. Heat oil and saute onions until soft. Add mushrooms, turn heat to medium high. Cook until mushrooms are browned, stirring often. This should take about seven minutes.
3. Add garlic and cayenne--try not to dump the cayenne directly on a mushroom or you'll get a very spicy bite later! Add salt and pepper as desired.
4. Add kidney beans, stir to combine. Cook until beans are warmed through. Remove from heat.
5. Arrange 2 tortilla halves, and 2 tortilla quarters to cover the bottom of an 8x8 baking dish.
6. Top tortillas with half the bean mixture, 1/2 cup salsa, and 1/3 of the cheese.
7. Add another layer of tortilla and repeat this process.
8. Top with one whole tortilla, 1/2 cup salsa, and the rest of the cheese.
9. Cover with foil and bake until center is warm--about 10 minutes. Then remove foil and bake for about 5 minutes longer, until cheese is bubbling.
Posted by Picasa

Sunday, May 27, 2012

We baked a cake

The three day weekend meant my friends had time to make the drive from Seattle to Pullman, so Selena, Kara, and Keith have been over to visit! Yesterday Selena and I attended the Kendrick Locust Blossom Festival in Kendrick, Idaho. Kendrick has a population of around 300, and while many people come in from the nearby towns, it was definitely a small town affair! We watched the parade, then strolled in the park and looked at the booths.

On the way back into Pullman we started getting excited about cake. I'd come across a recipe for an Almond Joy Layer Cake a couple of days before and thought it could be interesting to try, so we gathered the necessary ingredients and got started!

The recipe comes from Rachel Ray Magazine, though we didn't follow it 100%, so I'll give you a breakdown.

For the cake batter you need:
2/3 cup unsweetened cocoa powder
2/3 cup water
1 stick (4oz) unsalted butter, cut into 8 pieces
3oz (about 1/2 cup) semisweet chocolate, chopped
2 tsp vanilla extract
1 1/2 cups granulated sugar
1/2 tsp salt
3 eggs
1 1/2 cups flour
1 1/2 tsp baking powder
1 tsp baking soda
1 packed cup sweetened shredded coconut

Preheat the oven to 325 degrees. Oil and flour two 8x2 cake pans (or 9 inch since that's what we had...).
Boil the water in a medium saucepan. Whisk in cocoa powder until smooth. Whisk in butter and chocolate over low heat, until melted. Remove from heat and whisk in 1 1/2 cups granulated sugar, 2 tsp vanilla, and 1/2 tsp salt. Whisk in 1 egg at a time; beat well after each addition.
In a large bowl, combine flour, baking powder, and baking soda. Pour in chocolate mixture, incorporate until smooth. Add coconut. Pour batter into two prepared pans, and bake in the lower third of the oven for about 35 minutes.
Cool in pans on wire racks for 10 minutes, then remove and cool completely.

Now, once the cakes are cooled most normal people would cut them in horizontally in half into two layers. Because we had 9-inch pans, our cakes were a little thin for that. Instead, we cut each round in half and stacked the four half circles we were left with to make one very tall cake. In the picture it looks like we made a completely cylindrical cake, but that's not quite it... only half!


To frost the cake, we departed from Rachel's recipe and did our own thing. Toast 2 cups sliced almonds in your 325 degree oven for about 12 minutes, then let cool. We used a store bought whipped cream frosting, and just mixed about 2 cups of coconut, and 1 1/2 cups of the toasted almonds with only 2/3 of the frosting. This mixture was put between the layers, and on the very top of the cake. What was left without coconut and almonds we used to frost the outside for an attempt at a finished look. :)
 
Posted by Picasa

Saturday, May 26, 2012

What else is on the menu lately?


Even though I've been in Pullman for almost two months I am still having trouble getting into a routine. I'm looking for a yoga class, trying to stick to a good schedule of taking Alice out for long walks, and getting better every week at making sure I'm preparing healthy meals and snacks.
Occasionally I just need to step back and remind myself of a few healthy things I can easily put together.
Honey Glazed Chickpeas, for example.

I went through a phase of making big batches of roasted chickpeas that were spiced with chili powder, mostly to take in the car during road trips.

These chickpeas are very easy to make, and even easier to eat. So easy, in fact, that I ate half the batch fresh out of the oven, and the other half as a midnight snack later that night. None left for the work week. Oops.

In case you want to make a batch of your own, here's the recipe! (From The Pastry Affair)

Honey Roasted Chickpeas
Ingredients:
1 (15 ounce can) chickpeas
1 teaspoon ground cinnamon
2 teaspoons canola oil
1 tablespoon granulated sugar
1 tablespoon honey

1. Preheat oven to 375 degrees F.
2. Drain chickpeas and rinse under cold water. Let chickpeas drain/dry for a few minutes.
3. Whisk together cinnamon, oil, and sugar a liquid measuring cup. Place chickpeas in bowl, pour cinnamon mixture over, and stir until chickpeas are evenly coated.
4. Spread the chickpeas on a large baking sheet and bake for 35-40 minutes, or until crunchy and no longer soft in the middle. Sometimes they do this neat exploding thing in the oven. Be sure to take out any that pop off the baking sheet when your oven is cool--they stink when they burn the next time you turn the oven on.
5. Place hot, roasted chickpeas in a large drinking glass. Drizzle honey over the chickpeas, put some sort of lid on the glass, and shake it around until the chickpeas are as evenly coated as possible.
6. Spread chickpeas back out on baking sheet and allow to dry. Attempt to store in an airtight container at room temperature rather than eating them all at once. :)


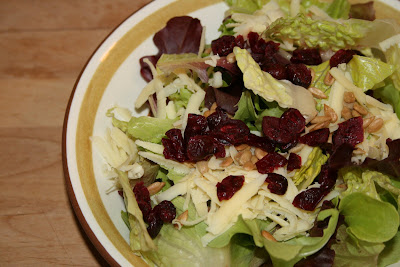
Also in my mealtime repertoire are green salads. I had a momentary lapse in memory a few days before picking up my CSA share and bought a big package of romaine hearts at Costco. Then I got a big bag of beautiful baby lettuces in the CSA. When combined, I get a lovely little salad. Topped with a drizzle of raspberry vinaigrette, sunflower seeds, dried cranberries, and some fantastic cheddar cheese it makes a very satisfying addition to a meal.

If you've been reading long, you'll remember the quinoa patties I whipped up while living in Arcata. They were a standby for awhile, and different ingredients went into the mix with every batch that was made. This week I actually stuck pretty close to Heidi's recipe from Super Natural Every Day because I finally had the chives it calls for! Courtesy again of my CSA share!
Posted by Picasa

Tuesday, May 22, 2012

Palouse Falls State Park

I made it to another state park on Sunday. Palouse Falls is a couple hours outside of Pullman, and definitely worth the drive. The first thing that struck me upon getting out of the car was the scent of black locust tree blossoms hanging in the air. It was a humid day, verging on rainstorms for most of our visit, and the beautiful smell of the flowers clung to the breeze as it brushed past us.

The falls themselves were spectacular. I snapped a few pictures (not enough to warrant a huge post, that's for sure) and just soaked in the view and the calming sound of the waterfall.
 
Posted by Picasa

Monday, May 21, 2012

Cha-cha-cha-chia!

You've heard of Chia Pets. I remember a chia cat, and my neighbor having a chia head. There's even a chia Fremont Troll. What you may not know is that the seeds used on those kitschy little decorations are actually a tasty little superfood. I had cooked a little with chia seeds in the past, but when I came across a number of recipes for "Chia Pudding" I was intrigued. There was chocolate involved, so I thought it would be worth a shot. If my late night snack has to include chocolate (yes, it usually does), then perhaps I could make it just a little bit healthier than a bowl of ice cream.

So I gave "Chia Pudding" a shot. I wasn't that impressed by it, but I won't stop trying!
The basic recipe I used was:
3/4 cup almond milk (this may be part of the problem. I buy unsweetened almond milk, which is just not as creamy or flavorful as you need if you're trying to make this dessert-like.)
1/4 cup chia seeds
2 Tbl honey
2 tsp cocoa powder


Begin by mixing the milk and chia seeds, then add the cocoa and honey. It's that simple. Let the whole thing sit for half an hour so that the chia seeds can gel, and then dig in.

I found that the leftovers I put in the fridge and then ate 24 hours after mixing were tastier--the whole thing had more time to gel and for the flavors to solidify in a way. I also tossed in a few mini chocolate chips for some added texture. Foods that don't require much chewing don't usually go over very well with me. (Hence the reason I typically avoid soups...)
Posted by Picasa

Sunday, May 20, 2012

Honey Glazed Radishes


You have to try this. Until last weekend, I don't think I had ever eaten a radish in my life. (I know, terrible, right?) When I picked up my CSA share at the farmers market on Wednesday, I found bok choy, salad mix, chives, baby kale and chard, and a big bunch of radishes. I am not the best vegetarian--there are a lot of vegetables I'm still coming to terms with. I usually stick with what I know; mainly broccoli, carrots, etc. No idea why radishes were missing. Especially because the recipe that Margaret at Omache farm provided for them is AMAZING.


Ingredients:
1 Lg Bunch Radishes
1 Tbsp Butter
½ Cup Chicken Stock
1 Tbsp Honey
¼ cup minced onions, shallots or spring onions
Salt to taste

Once everything is assembled, it's incredibly easy.
Top radishes, slice in half for easier eating (forget to do this if your name is Lauren).
Melt butter in pan. Sautee onions until soft.
Add radishes, stir until coated in butter.
Add stock and honey. Cover and simmer 10 minutes.
Remove cover; simmer until liquid thickens to glaze.
Add salt as desired and serve warm.


I topped with a sprinkle of chives to green things up a bit--this dish does look really drab when it's done. But it's so tasty!!! Cooking the radishes takes away a lot of their spiciness, and I'm a sucker for anything that uses onions to add a bit of extra sweetness.
Posted by Picasa

Sunday, May 13, 2012

Notes on a weekend

No pictures today, just lots of words! Hope you can handle it!

This weekend I spent most of my time at Omache Farm doing some transplanting and weeding, and helping lay out drip tape and mulch paper. This seems to have been our first really hot weekend for the summer, with temperatures in the seventies yesterday and the eighties today. I was pretty stressed out about work by the end of last week and it was really great to have some work to keep me busy and great friends to hang out with to pass the weekend instead of focusing on what lies ahead of me this week. Just a hint, we are going to Prosser tomorrow where it is supposed to be 97 degrees. Ouch.

I made another great loaf of almond bread today, and this time I'm actually going to share my recipe. I think this may be one of those things I change up every time I make it, always adding a different twist. This time, for example, I used chia seeds in the almond spread but forgot to sprinkle cinnamon, so I got an added flavor and kind of missed out on one.

For the bread:
2 1/4 teaspoons yeast
1/4 cup warm water
1 cup whole wheat bread flour
1 cup white bread flour
1/2 cup butter (although at this moment I've realized I only used about 1/4 of a cup this time around...might account for some of the dryness! oops! It's still tasty though!)
1/4 cup room-temperature milk
1 room-temperature egg

Start by mixing the yeast and water in a large bowl, then add the milk, egg, butter, and flour. Those of you with a stand mixer can use a bread hook to mix everything together until the dough cleans the side of the bowls. In my kitchen the best tools I have are my hands, and I knead the dough until everything is incorporated, and then a bit longer. I then pick up my dough and cloak it before setting it in a bowl and covering with plastic wrap. The dough then sits in the fridge for 12-24 hours.

For the almond filling:
1/2 cup blanched almonds
1/4 cup powdered sugar
1 tablespoon coconut oil
1/2 teaspoon almond extract (this is something I didn't have the first time I made this bread, and let me tell you, it makes a world of difference!)
1 "chia egg" (1 teaspoon chia seed mixed with 3 teaspoons water and allowed to sit until gelled, about 5 minutes)

Pulse almonds, powdered sugar, and coconut oil in your food processor until almonds are ground to a desired size--bigger chunks don't bother me! Add the almond extract and chia egg and pulse until combined.  That's it--it's that simple!

When you're ready to start shaping the bread, preheat your oven to 350 degrees.

Remove your bread dough from the fridge and roll into a rectangle about 1/4 inch thick. The dough is a bit easier to work when it's had a few minutes to thaw, so my technique today was to roll out the basic shape, put together the almond filling, and then finish rolling the dough when it had warmed just a bit.

Spread the almond filling on the bread dough as evenly as you can. It may be a bit thick--just deal with it. At this point you may want to add a few other things, like some sprinkles of cinnamon or turbinado sugar (that one I did remember to do). Then roll the dough lengthwise (you end up with a long skinny roll), and use a serrated knife to cut it in half lengthwise. You'll now have two long sections that when split apart will reveal the filling. I then twist these sections together, trying to keep the filling edge pointed toward the center of my twist, though I don't think it'll make a huge difference for the finished product. A little bit of pinching at the top and bottom of the twist will help it hold together.

Then transfer your twist to a baking sheet, pop into that 350 degree oven, and bake for 30-35 minutes. I made a really skinny twist today, so it was definitely on the short end of baking times. After it cools the bread can be cut and slices packaged individually for freezing--this makes pulling one out for a workday snack really easy.


Monday, May 7, 2012

Tulips!

The part of Pullman that I live in is conveniently home to a number of city parks, and the city's formal garden. The land and funds for Lawson Gardens were donated to the city in 1985, and since then Pullman has done a great job of turning the site into a beautiful garden that makes for a nice place to visit on a sunny day. For a very reasonable rate you can also reserve the central lawn for weddings, something that seems to take place quite frequently.

After hearing from a neighbor that the tulips were plentiful at the garden, I decided to wander over one afternoon and check it out. I snapped some pretty good photos, and did it just in time, as the following two days we saw snow, torrential rain, and high winds--not so gentle to tulip blooms.


(those of you in the botanical know, please ignore that bulbs are not actually roots...)


And now, obligatory picture of Alice:


We just recently started an advanced obedience class, and on the first day Alice did a great job of showing everyone what an absolutely energetic, out of control dog looks like. She's so food motivated she loses her mind when there are really tasty treats around and it's all I can do to keep her energy level low. But energy is great! And no one can condemn a happy dog!


Saturday, May 5, 2012

Almond Bread

One of the first things I baked after moving into my Pullman apartment was this great Braided Almond Bread. It freezes very well, which was very beneficial because I didn't want to eat the whole loaf all by myself in the short span of time before it would have gone bad if left out. It was also very nice to be able to pull a thick slice of bread out of the freezer on the way to work in the morning and have it for a morning snack.


Part of making the almond filling was blanching the almonds--something I'd never done before. I was amazed at how easy it was! I'm pretty sure the original recipe has you make enough almond paste for two loaves of bread, but I used the whole almond paste recipe on just one loaf--it wasn't overpowering, so you're definitely encouraged to go that way.


I used a bit less sugar than the recipe called for, so my bread didn't exude sugar the way you might see in the original recipe posting, but it was still dang tasty! (and easier to clean up.)